Contents
- How the tool works
- Installing the tool in your GitHub account/organization
- Creating your first migration
- Creating your first pull request
- Types of migrations supported
- Examples of migrations
- Posting progress updates on pull requests
- Dark mode 🕶
- Security
How the tool works
Caribou allows for continuous monitoring of a GitHub repository based on specific rules, to understand how the removal of technical debt is progressing. Caribou is language-agnostic as it treats all files as text and tracks files based on their names, their file extensions, their contents, and the directories that they are in. Caribou then allows you to track how that number of files that match these rules changes over time, typically decreasing as you are migrating away from these files.
So if you are changing the programming language of your project from Java to Kotlin, you would be tracking the Java
files as they are being removed from the project. There are also cases where you might want to track the introduction of
new files into the project, for example, when you are introducing an architecture that has a specific naming convention,
such as introducing the Model-View-ViewModel (MVVM) architecture on Android, where every View related class (
Android Activity, Fragment or other) needs to be accompanied by a ViewModel class.
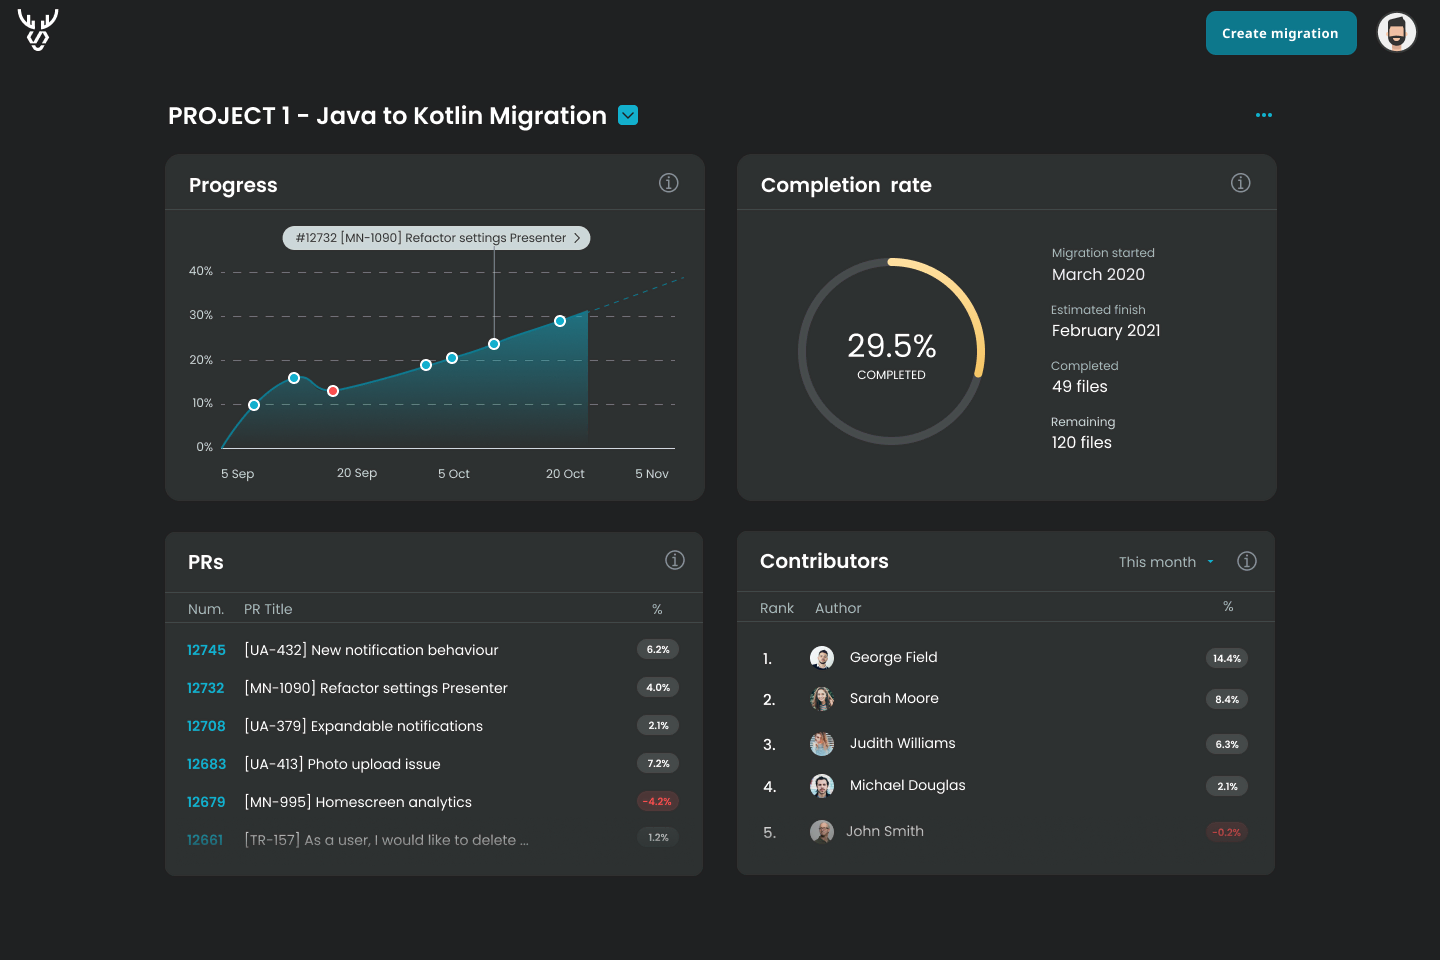
Once a migration is defined, Caribou monitors all Pull Requests against a selected branch, and re-triggers the analysis of the repository for every change introduced, understanding in this way how each PR contributes to the migration. It then populates a dashboard with information about the progress of the migration, the pull requests that contributed to it, the contributors, estimation about the finish time, and much more.
Caribou also posts comments on the pull requests themselves to provide useful information about how a PR contributes to a migration, or warn engineers when a regression is introduced. Finally, Caribou also connects to your Slack workspace so that you can get real-time updates for your migration and motivate your team to continuously make progress! 🚀
Installing the tool in your GitHub account/organization
For Caribou to be notified when Pull Requests are raised and to be able to check out your repository code in order to analyze it, it requires certain access permissions from your repository. To provide access to Caribou please follow these steps:
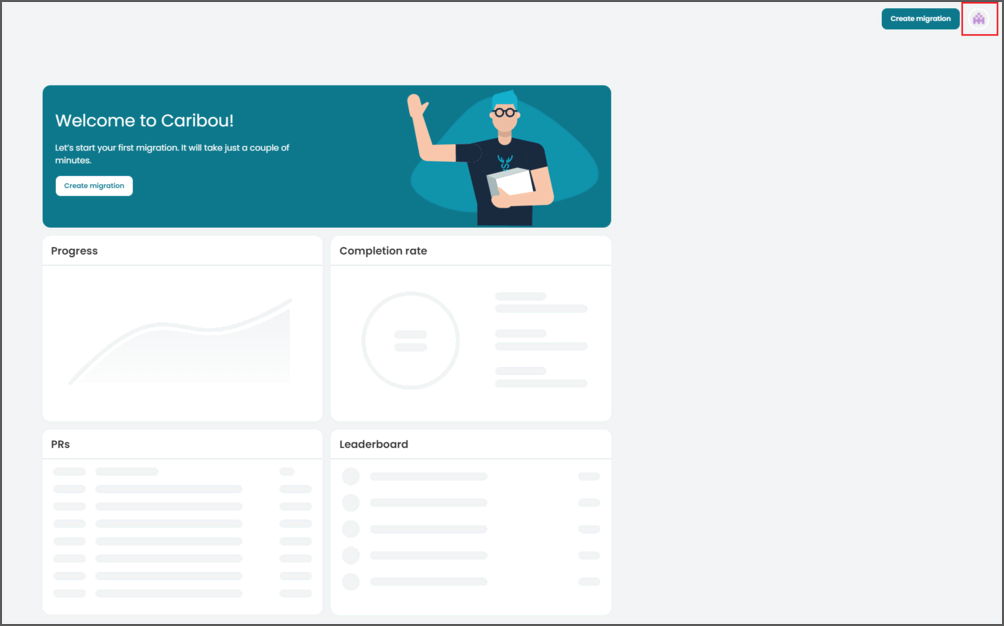
- Click on your profile button, at the top right of the main Caribou dashboard page.
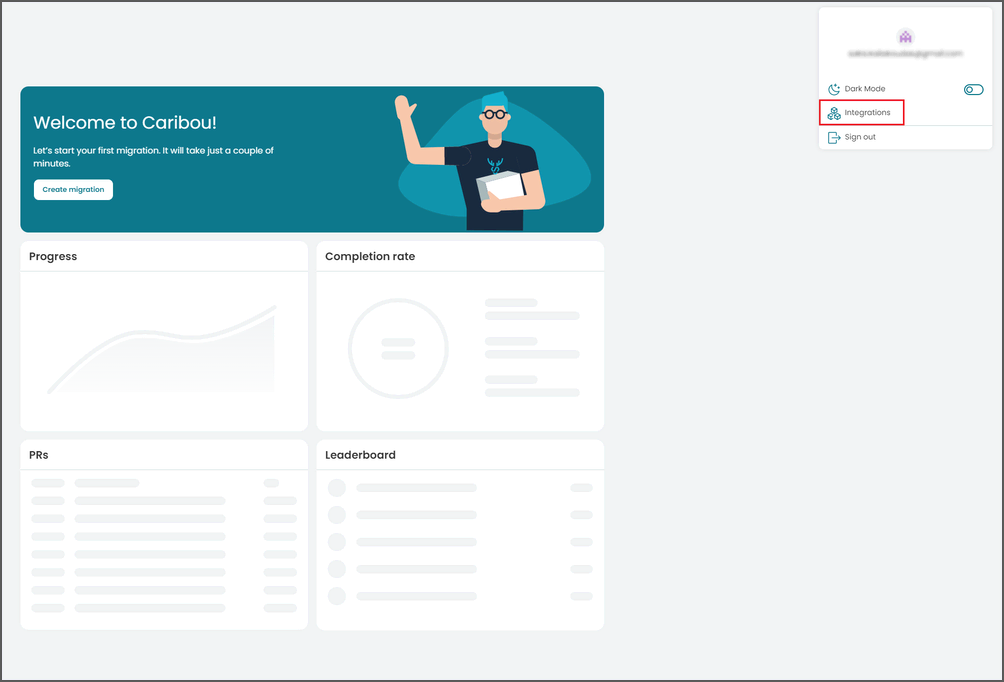
- Click on the
Integrationsbutton of the menu.
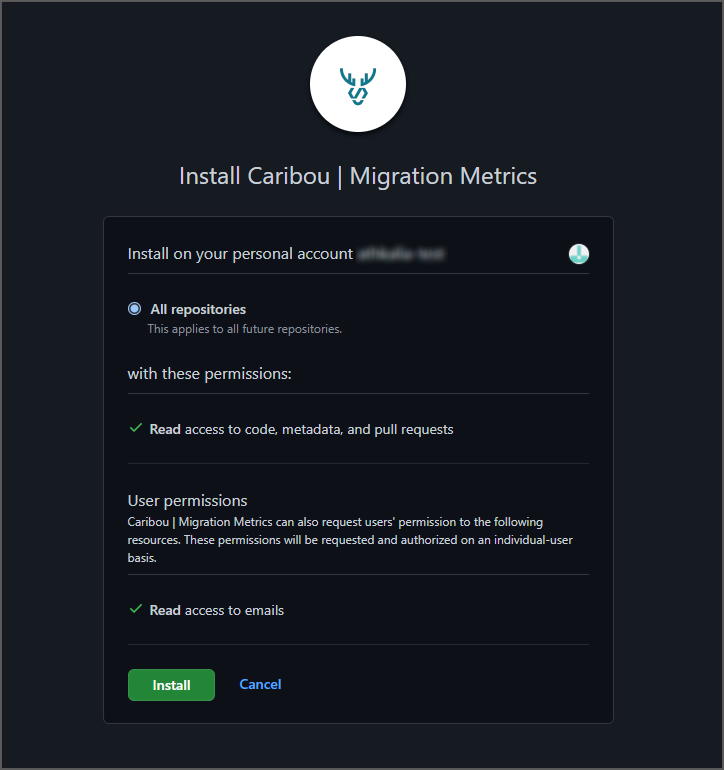
- You will then be redirected to GitHub, where you will be shown a screen informing you of all the permissions that Caribou requires:
- Read access to code, to be able to check out the repository and perform the analysis.
- Read access to Pull Requests, to be notified when new changes are introduced.
- Write access to Pull Requests, so that the Caribou bot can post comments on pull requests when a pull request is affecting a migration.
- Read access to the so-called
metadatapermission. This permission is automatically included by GitHub (as can be seen here), and contains some read-only APIs with non-sensitive information.
Caribou finally requests read access to your email address, as this is how Caribou is able to recognize you and sign you in.
🔒️ At Caribou, we take security very seriously. For more details, please check our dedicated security page here.
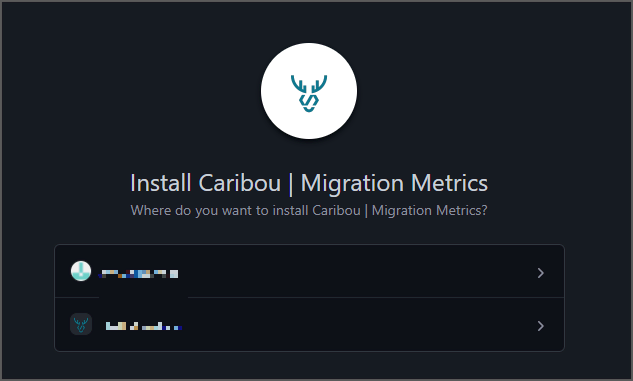
Please note that if your GitHub account has access to multiple organizations, then you will see this screen first, that allows you to choose which organization you’d like to install Caribou on:
Creating your first migration
Once you’ve granted Caribou the necessary permissions to be able to access your GitHub repository, you are ready to create your first migration! In these examples, we’ll focus on relatively simple migrations, but you can check out all the types of migrations supported here, or you can get inspired by some specific migration examples here!
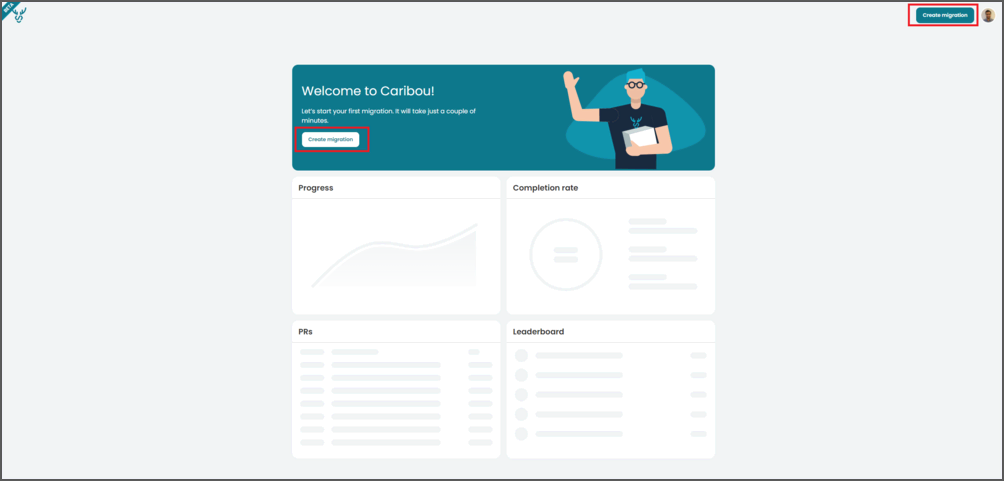
To bring up the migration creation dialog you can click on the Create migration button either on the banner (if this
is your first migration) or in the top right corner of the dashboard as shown below:
The migration creation dialog provides a three-step process for creating your migrations. The first step shown below
allows you to input the migration name, and the GitHub repository and branch involved in this migration. We recommend
creating migrations against the branch that your team targets with their day-to-day development work pull requests. For
many teams that might be the develop branch, but you are free to choose any branch you like!
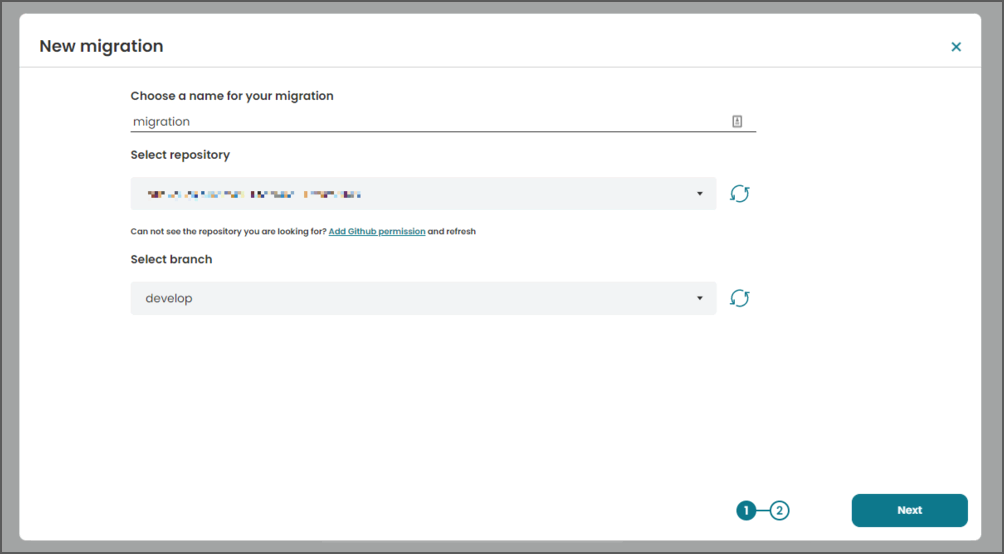
Once you are done with your selections you can click on the Next button to add the rules that define your migration.
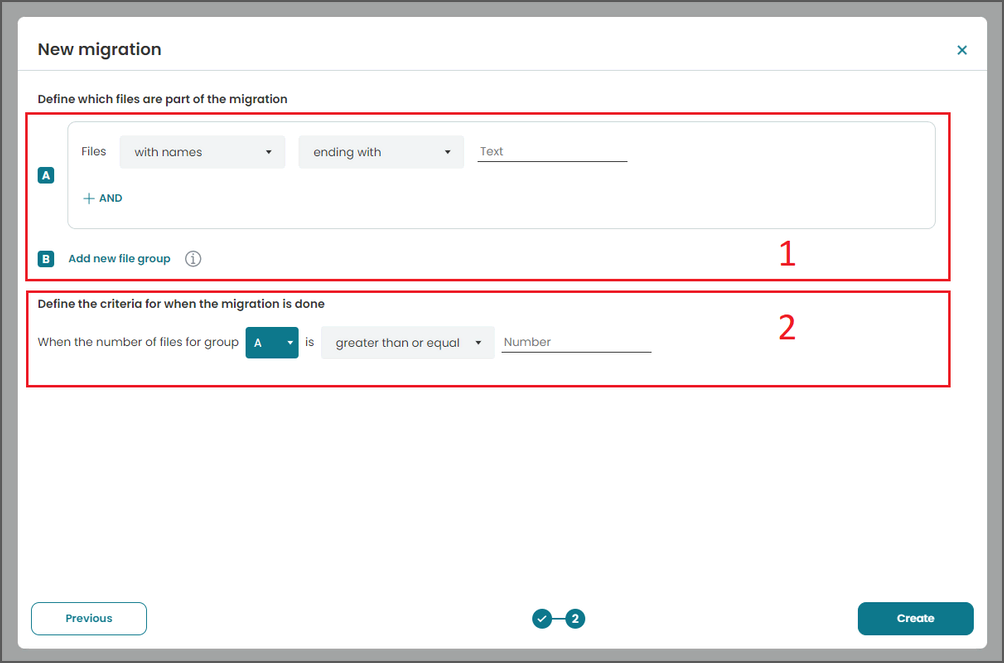
Migration configuration consists of two parts; file groups (marked with 1 below) and migration end criteria (marked
with 2 below). The idea is to define rules that match against the files that are going to be part of the migration.
Then define the migration end criteria; i.e. what should the number of files in specific file groups be at the end of
the migration.
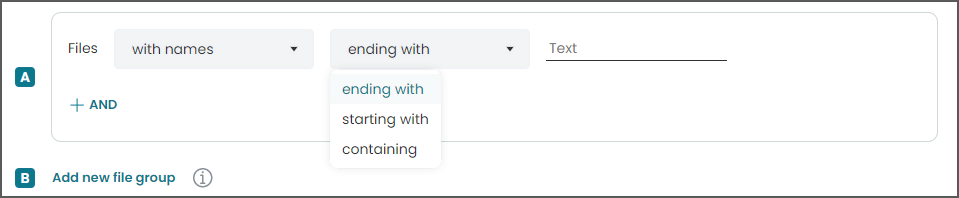
Let’s start with the first part, part 1. For this part, you need to tell Caribou which files are part of this
migration. Remember that Caribou is tracking whole files, so you need to tell it which files are of interest in this
migration based on some attributes that they have. Please check
here for the types of migrations supported. For example, you can ask Caribou to track
all the Java files in a project by creating a rule that looks like this:
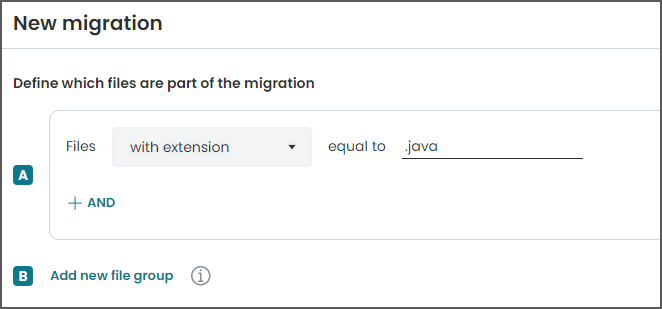
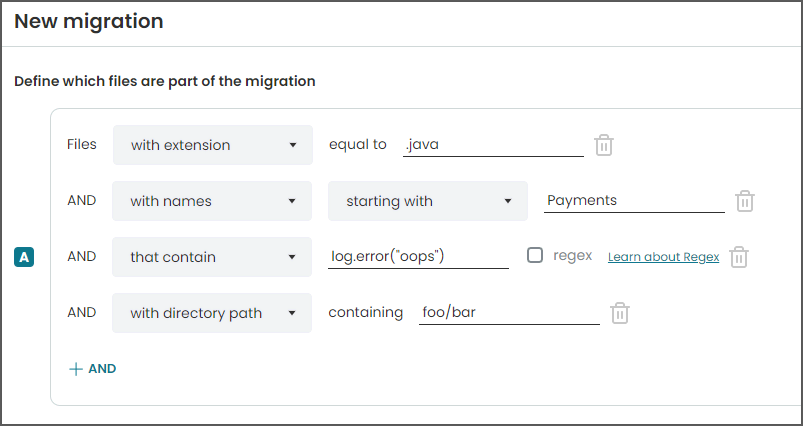
Clicking on the + AND button will allow you to add more rules to further narrow the search; Caribou will only track
the files that match against and the rules in group A at the same time. For example, if you want to track
all Java files that are in the directory foo/bar and contain the following statement log.error("oops") and
their name also starts with Payments you need the following configuration:
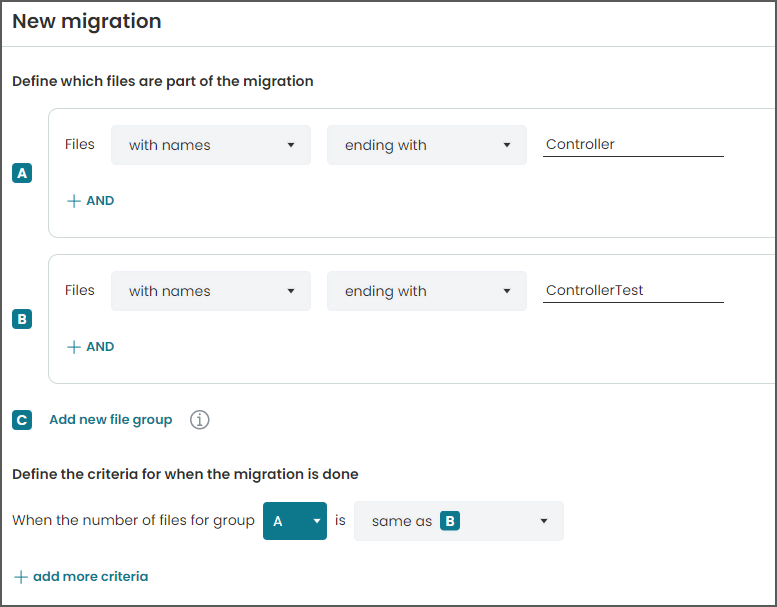
Another option is to track multiple groups of files where each one has entirely different rules, but all files need to
be tracked as part of the same migration. For example, you might want to track all Java files that their name ends
in ..Controller and all Scala files, regardless of their name. For that you would need the following configuration:

⚠️Overall, you can create up to 10 files groups, each one containing up to 5 rules.
Let’s now go to part 2. After defining the file groups, you need to set what the number of files in each file group
needs to be for the migration to be considered complete. This is called the migration end criteria. Migration end
criteria can be an absolute number (e.g. less than 0) or a relative one, comparing file groups to one another (e.g.
file group A needs to have fewer files than file group B). An example of this could be when introducing tests for
some files in your project, and you want to have a 1-1 mapping between the code and the tests, as shown here:
The options that you can choose from for your migration end criteria are the following:

-
greater than or equal: For example, you might have a task to introduce some test classes and the migration is considered done when 20 Test classes are introduced. -
less than or equal: For example, you might be removing some files from your repository and the migration is considered done when the number of files reaches0. -
same as: This is used when you want to compare files from different file groups, like the example given above with theControllerclasses and theControllerTestclasses. When using this option, if you have 2 files groups and both of them contain a rule for files namesending witha particular suffix orstarting witha particularprefix( again, like the example given above) then Caribou is able to intelligently match the files together, so that for example aPaymentsControlleris only matched against aPaymentsControllerTestand not against another file ending in..ControllerTestlike aChatControllerTest.
⚠️You can have up to 1 migration end criteria per file group that you define.
Once you have configured your migration, it’s time to proceed to the next step. In this step, you will be able to validate the migration configuration by running an analysis against your repository in real-time. The first step for that to happen is to perform a Git checkout.
First, let’s assume that we’ll work with the following migration rules for this example:
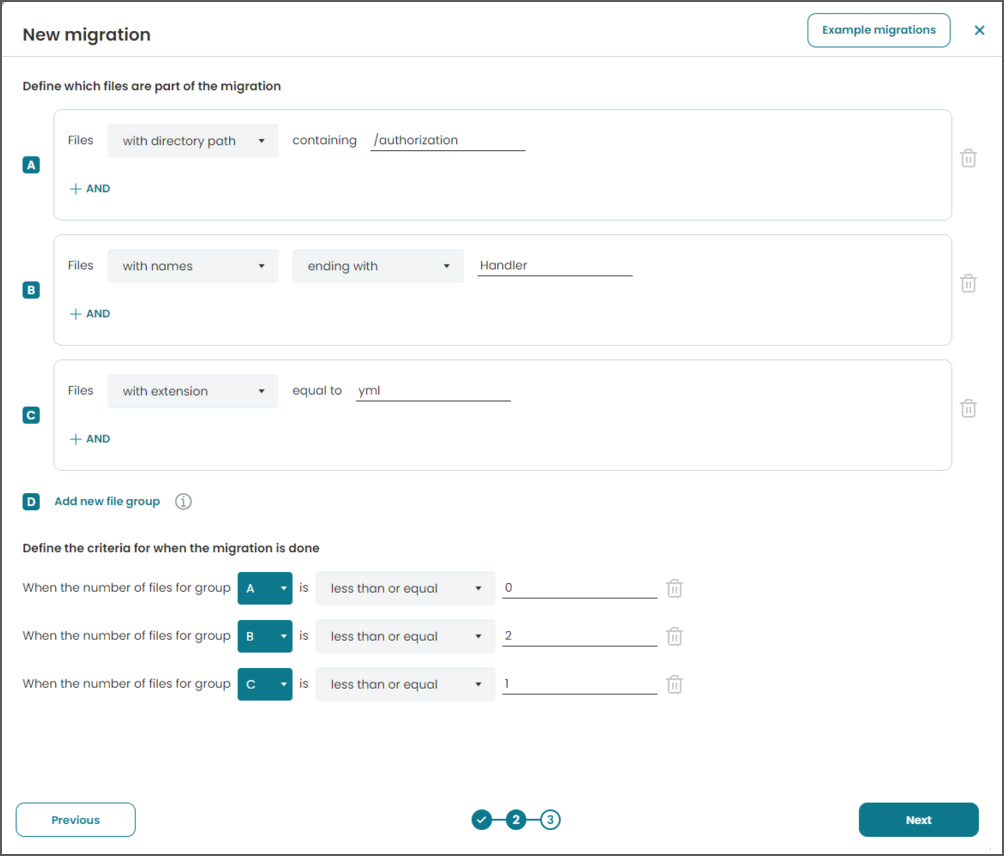
As we see above, we have 3 file groups, and each one has different migration end criteria.
- File group A needs to migrate all files.
- File group B needs to migrate all but 2 files.
- File group C needs to migrate all but 1 file.
As soon as you hit the Next button, you will see a screen informing you that the Git checkout process has started:
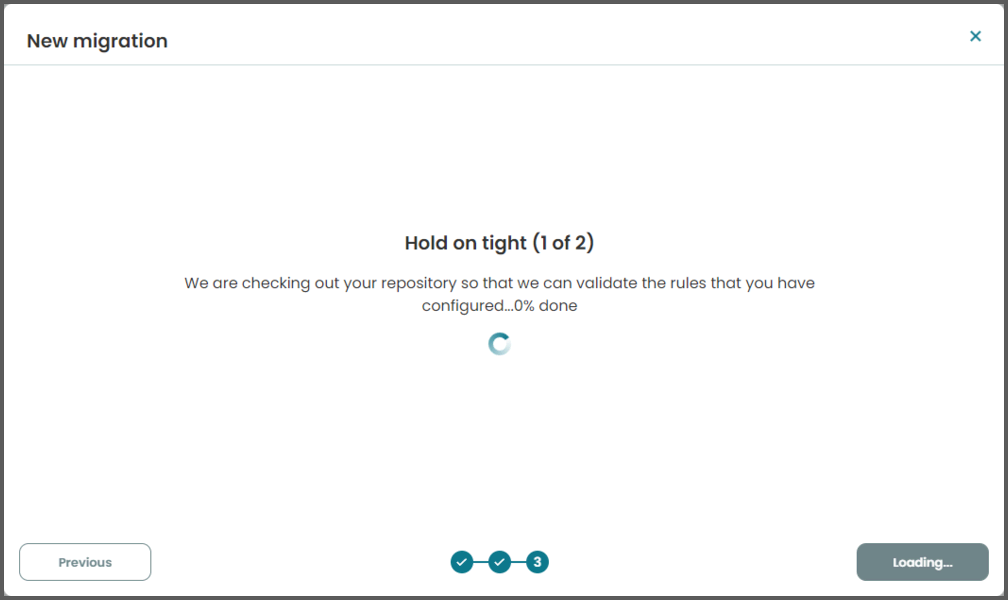
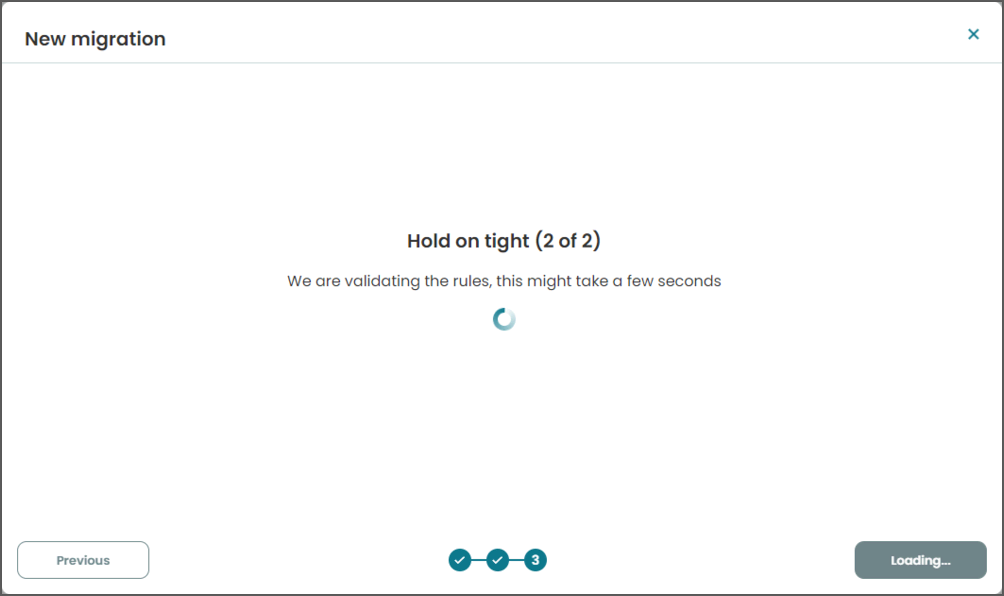
This typically only takes a few seconds (depending of course on the size of your git repository). As soon as that is done, you will see a new screen informing you that the analysis of the repository based on the migration configuration has started:
Again, this doesn’t take long and once it is complete you will see a screen with the analysis results:
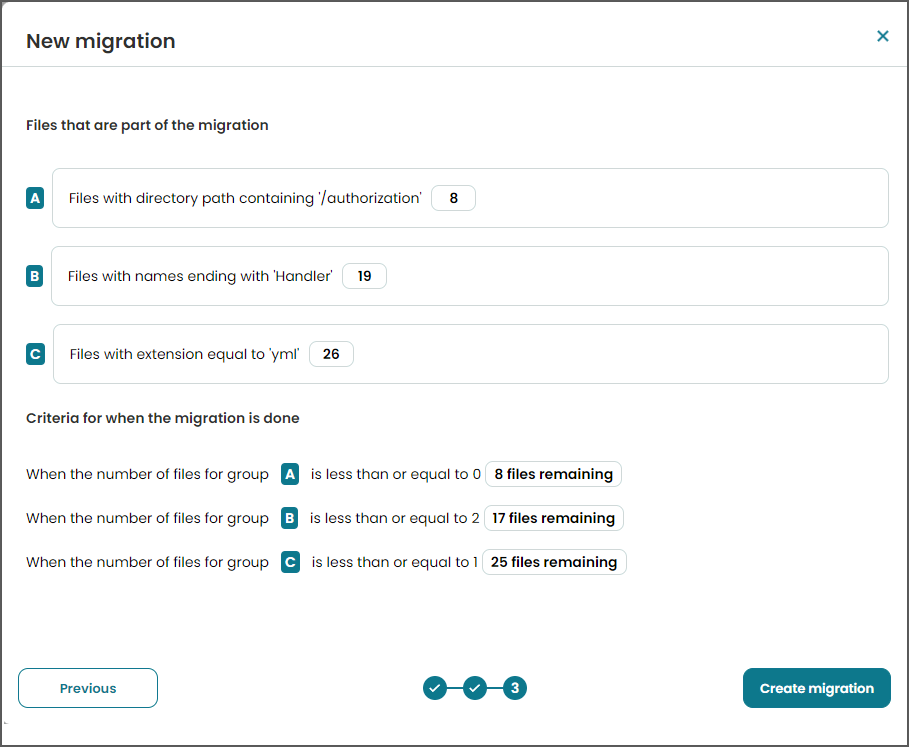
Here you can see how many files have been matched against each file group, and the total number of files that need to be migrated based on your migration end criteria. In this particular example, you can see that there are:
8files matched against the rules from file groupA.19files matched against the rules from file groupB.26files matched against the rules from file groupC.
Finally, we can see the migration end criteria section:
- For file group
Awe had set as migration end criteria that it needs to reach0files, so all8 - 0 = 8files are remaining. - For file group
Bwe had set as migration end criteria that it needs to reach2files, so there are19 - 2 = 17files remaining. - For file group
Cwe had set as migration end criteria that it needs to reach1file, so there are26 - 1 = 25files remaining.
Clicking on any of the 3 file group file numbers (8, 19 or 26) allows you to see the names of the files:

If everything looks right, then you can proceed and create the migration, while if you want to tweak any of your rules, you can hit the back button to go to the previous screen.
Creating your first pull request
Once you go through the migration creation wizard as shown in the section above and
you hit the Create migration button the migration will be created, and you will be navigated to the main dashboard for
this migration:
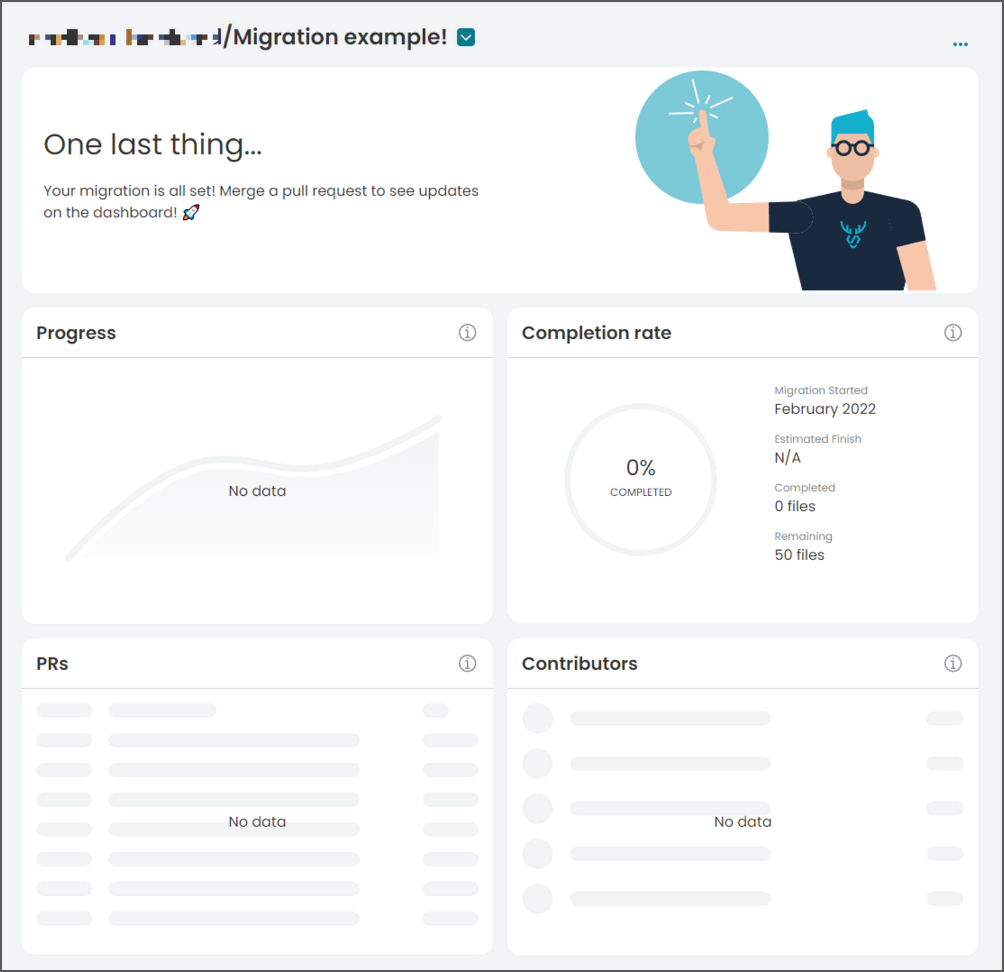
As you can see, the remaining files for this migration are 8 from file group A, 17 from file group B and 25
from file group C, which add up to a total of 50 files.
Now it’s time to merge your first pull request for this migration. Anytime a pull request is merged into the repository against a branch that Caribou is tracking as part of a migration, Caribou will automatically run the analysis again in order to understand the contribution of the PR to the migration, and present the findings on the dashboard.
❗⚠️❗ Please note that pushing directly to a branch does not currently trigger the same analysis and the outcome of the push will be attributed to the next pull request that gets merged into this branch.
Types of migrations supported
The following types of rules are currently supported by our rules engine:
File name rule
The file name rule allows you to match against anything in the name of a file. You can:
- Find all the files whose name ends in a particular word (e.g. all files whose names end in
..Controller). You can optionally include the extension if you want to! - Find all the files whose name starts with a particular word (e.g. all files whose names start with
Payments..) - Find all the files whose name contains a particular word (e.g. all files whose names contain the word
Encryption).
Please note that all 3 options are NOT case-sensitive.
File extension rule

The file extension rule allows you to match against files that have a particular extension. For example, you can match
against all Java files in a project. You can use this rule with our without the . character, i.e. filling the field
with .java or java will produce the same results.
Please note that this rule is NOT case-sensitive.
File contents rule

The file contents rule allows you to match against the contents of a file. You can search for anything you like, for
example, import statements of a particular library that you want to remove. For more dynamic matching you can also
search the contents of files using a regular expression. Please note that the Java regular expression engine is used
which can be found
here, after clicking on the Java 8 option on the left menu.
File path rule

The file path rule allows you to match against partial paths of files. Some examples:
devmatches againstdev/bla/file_0.txt, but also matches againstexample/dev/foo/file_1.txt, as well asexdample/developer/bar/file_2.txt.dev/fooordev\foomatches againstdev/foo/folder-1/file_3.txt, but also againstanother-folder/dev/food/file_4.txt.
Please note that you can use either front backslashes (/) or forward slashes (\) to define the directory separators.
Examples of migrations
Please check out this page for examples of migrations that you can track using Caribou.
Posting progress updates on pull requests
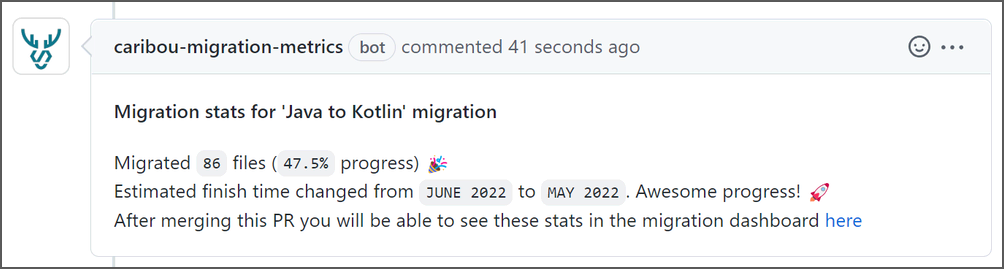
Caribou monitors all newly created PRs that are related to an ongoing migration. It then automatically posts a message on that pull request to inform the team about the potential impact:
The pull request might be contributing to the migration, helping it move forward…
…or it might be going against the migration, causing a regression.
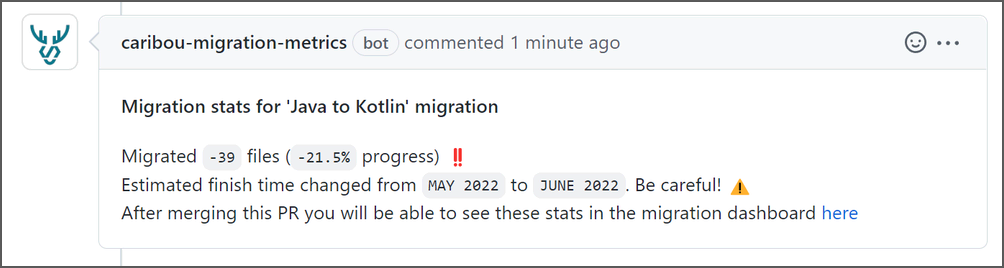
Your team is now informed before the PR is merged so that it can catch mistakes early in the dev cycle! 😎
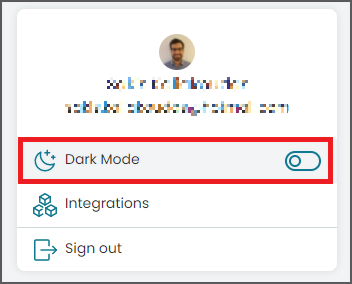
Dark mode 🕶
Developers love dark mode and so do we! In Caribou, you can easily toggle between light and dark mode from the menu on the top right:
Before:
 After: